 Microsoft Word has come a long way since the “pre-Windows, non-mouse” versions used between 1983 to 1990. Back then, there were NO graphics, not even a graphical user interface. The Word 1.0 for Windows 3.0 version was a notable improvement, but then it took two decades for Microsoft to figure out how to integrate quality graphics successfully.
Now, with Word’s many amazing graphical improvements, our jobs are much easier, plus you don’t need a separate desktop publishing program anymore. Word 2016 can now adequately fulfill that task.
Insert Pictures
Inserting pictures (from your hard drive, a DVD, or thumb drive) is a simple process in Word 2016. In the older Word versions, the resolution was significantly reduced when images were inserted. Not so anymore.
1. Click Insert > Pictures. Select the target drive, folder, and image, then click the Insert button.
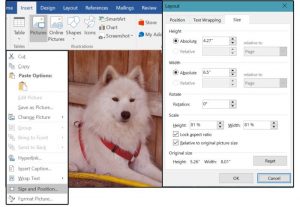
2. Right-click the inserted image and choose Size and Position from the popup menu.
Under the Size tab, notice the Height and Width are 4.27” by 6.5.” Under Scale, it says both Height and Width have been reduced by 81 percent.
3. Right-click the image again. Choose Save As Picture from the popup menu, select a target drive and folder, then name this new file.
Note, however, that the original size (Height and Width) says 5.26 x 8.01.
4. Open the new file in your favorite graphics program such as Photoshop, Paint Shop Pro, or even Windows Paint (in your Windows Accessories folder). Select the Image > Size option and notice that the saved image is the same size and resolution as the original.
IMPORTANT NOTE: Do not copy and paste the image from Word to another program. You MUST use the Save Picture As option from the popup option to retain the original size and resolution.
Online Pictures
Another impressive graphical feature that Microsoft added in 2013 is the Online Pictures option, which provides direct access to Internet images that match your Search request.
1. Select Insert > Online Pictures. Enter a subject in the Search box (such as Samoyeds), then click the magnifying glass (the Search button).
2. When the images appear, select the one you prefer, then click the Insert button. The image will appear where you placed your cursor in the document.
IMPORTANT: Note the Creative Commons message that warns you to review the user license of the image you select to ensure that you comply with the image owner’s rules regarding usage.
Insert Shapes
Now you can insert circles, rectangles, arrows, stars, banners, callouts, flowchart graphics, and dozens of other common, everyday shapes directly into your documents, and you get to draw them in any size you need.
1. Move your cursor to the target location. Select Insert > Shapes.
2. Click the shape you need. The cursor changes to a cross.
3. Hold down the left mouse button, then drag the mouse down and over to draw the selected shape.
4. Notice the shape is selected (handles on top, bottom and sides) and the Ribbon menu changes to the Format Drawing Tools menu.
5. Notice the curved arrow above the selected image. Use this tool to rotate the image.
6. Click the half-circle in the tiny text box on the top, right side of the selected image. The Layout Options popup menu appears. From this menu, choose how you want your text to flow around the image. Choose Move with Text or Fix Position on Page.
7. Select your Shape Fill, Outline, and (special) Effects.
NOTE: Click the image, then hold down the left mouse button to move the picture to another location.
Insert Icons
I thought the library of bullets and the ability to create custom bullets was a great feature until I discovered the Icons library. There are 26 categories, with over a dozen or so icons in each. These can be enlarged and used as inline or framed graphics, or reduced and used as icons or even bullets. Note that you can insert more than one icon at a time.
1. Select Insert > Icons.
2. When the Insert Icon library screen appears, scroll through the pages of icon images or select a category, choose a single icon (or several), and click the Insert button. All icons with checkmarks are inserted simultaneously.
3. Follow the instructions in the Insert Shapes section above to size, rotate, color (shape and outline), create special effects (Shadow, Glow, Bevel, etc.), and position on the page.
Insert Screenshot
Here’s another great feature that was once limited to a Print Screen and Paste action. Now the windows Clipping Tool is accessible through the individual Office programs, and you can capture the entire screen or select and capture a specific portion.
1. Select Insert > Screenshot.
2. The Screenshot window opens, displaying the Available Windows (for full screen capture). Select the preferred Window and it drops into your document at the cursor location.
3. Or, when the Screenshot window opens, select the Screen Clipping option. Word jumps to the last screen used, and the cursor changes to a cross. Hold down the left mouse button, drag down and to the right to select the specific portion of screen you want captured, then release the mouse button. The selected part of the captured screen drops in at the cursor location.
IMPORTANT NOTE: If there are multiple windows open (showing more than one screen available for capture), there is no easy way to switch among screens. Avoid the confusion and click the screen you want to capture first (from the Task View buttons). The last screen opened now appears first in the Available Screens window. Go back to Word and select Insert > Screenshot > Screen Clipping, and the preferred screen now displays.
Insert SmartArt
This one is simple, but a nice touch if you need some quick business graphics. Instead of searching, then stealing graphics from the internet; or rushing through PowerPoint or Excel to create your own; now you can just drop these “editable” graphics into your documents and customize them to your project.
1. Select Insert > SmartArt.
2. When the SmartArt library screen opens, scroll through the pages of images or select a category. Choose a business graphic, then click the OK button. The selected graphic inserts at the cursor location.
3. Next, insert your custom text in the boxes that say [TEXT].
NOTE: Notice that the Ribbon has a new tab called SmartArt Tools with two submenu tabs below that say Design and Format.
4. Use the Format menu to alter the Shape Styles, Fill, Outline, Special Effects, and WordArt. To use the effects under the WordArt menu, highlight the target word, then select a WordArt Style from the designs. Play around with all these features until your business graphic pops off the page.
5. Use the Design menu to change the business graphic Layout, Colors, and Style.
Insert Chart
The Word 2016 charts are absolutely the best ever. There are 17 styles with several designs within each style, and unlimited options and features to customize each chart.
1. Select Insert > Chart.
2. Scroll through the categories, select a style, then choose a design in that style and click OK. Notice the preview pane on the top right side of the screen that displays all the designs within the selected category style.
3. The chart inserts at the cursor location with a mini spreadsheet stretched across the bottom of the chart. Enter the numbers on the spreadsheet that represent the data you’re charting, then close the spreadsheet.
4. The icon buttons on the right access three chart format menus: Layout Options, Chart Elements, and Chart Styles, plus one database/spreadsheet menu: Chart Filters, which allows you to modify the data or create filters to edit data points or create/edit chart labels.
5. Notice also, that when the chart is selected, another new tab called Chart Tools appears with two submenu tabs below: Design and Format.
6. Again, use the Design menu to change the Chart Elements, Layout, Colors, Style, and Type, or access the Data buttons to Select, Edit, or Sort the spreadsheet data.
7. Use the Format menu to alter the Chart Styles, Fill, Outline, Special Effects, and WordArt (highlight the target word, then select a WordArt Style from the menu). You can also change the font, size, attributes, and paragraph options such as spacing, alignment, and indents.
NOTE: The features and effects are the same or similar for each graphic/illustration option. Play around with the design, formatting, and effects until you discover the methods that work best for you and your personal style. Have fun!
For more information on solutions for running your businesses’ technology more efficiently, visit our website or contact Megan Meisner at mmeisner@launchpadonline.com or 813 448-7100 x210.
This was originally posted by PCWorld. Image: JD Sartain / PC World